Table of Contents
ToggleInstalling carpet yourself can feel intimidating, but thousands of homeowners tackle it every year with solid results. DIY carpet installation isn’t as complicated as it looks, and it can save you 40-50% compared to hiring professionals. That said, it’s not a casual Saturday afternoon project: it demands patience, proper tools, and realistic expectations about what you can handle solo. This guide walks you through the actual process so you can decide whether you’re ready to stretch, seam, and secure your own flooring, or whether calling a pro makes more sense for your situation.
Key Takeaways
- DIY carpet installation can save you 40-50% on labor costs, but requires proper tools like a power stretcher rental, realistic expectations, and careful preparation to avoid costly mistakes.
- Proper subfloor preparation is critical—it must be clean, level, and moisture-tested to prevent premature carpet failure, wrinkles, and mold issues.
- Renting specialized equipment (power stretcher, seaming iron) rather than buying is the most cost-effective approach, with rental packages available at local home centers for $30–$75 per day.
- Accurate measuring, cutting, and 24-hour carpet acclimation in the installation room prevent bunching and wrinkles that plague DIY projects without professional-grade stretching.
- For large rooms with multiple seams or complex layouts, hiring a professional is worthwhile; simpler rectangular spaces like bedrooms and hallways are ideal DIY starter projects.
- Stretching, seaming, and final trimming require skill and strength—if you’re unsure about these steps, hiring a professional for stretching while handling prep yourself offers a practical middle-ground approach.
Is DIY Carpet Installation Right for You?
Carpet installation breaks into two camps: cosmetic and structural. Pulling out old carpet, prepping the subfloor, and laying new padding and tack strips? Most DIYers can manage this. Stretching carpet with a power stretcher and seaming two pieces together? That’s where the difficulty spike hits.
Honestly assess your comfort level. Do you have experience with power tools? Can you rent or borrow a power carpet stretcher (rental fees run $30–$75 per day)? Are you working on a simple rectangular room, or navigating stairs, closets, and doorways? Small, straightforward spaces, a bedroom, hallway, or basement, are ideal starter projects. Large open-plan rooms, especially those with multiple seams, demand more skill.
One more thing: check your lease if you’re renting, or your homeowner’s insurance and local building codes. Most residential carpet installation doesn’t require a permit, but removing flooring might trigger regulations around asbestos in older adhesives or underlayment. If your home was built before 1980, have any flooring materials tested before disturbing them.
If you’re installing carpet in a high-traffic commercial space or a complex multi-room layout, hire a professional. The few hundred dollars you save won’t be worth a wrinkled, bunched, or poorly seamed floor.
Tools and Materials You’ll Need
Before you start, gather these essentials:
Tools:
- Power carpet stretcher (rental recommended: essential for proper installation)
- Knee kicker (manual stretching tool, ~$30–$50 to buy)
- Seaming iron (for gluing seams: rental ~$20–$30/day)
- Utility knife with fresh blades
- Measuring tape (25-footer minimum)
- Straight edge or metal ruler
- Heavy-duty scissors or carpet shears
- Carpet trimmer or cutter (optional but helpful)
- Hammer and knee pad
- Tack strip cutter (or you can score and snap manually)
- Seaming glue and roller
- Safety gear: work gloves, safety glasses, dust mask, knee pads, hearing protection (for power stretcher)
You don’t need to own every tool. Rent the power stretcher, seaming iron, and specialized cutters from a local home center: most offer packages that bundle them affordably.
Materials:
- Carpet (measure your room carefully: factor in waste for seams and pattern matching)
- Cushion/padding (typically 7–12 oz. density: standard thickness is 3/8 inch for residential)
- Tack strips (pre-nailed into subfloor around the room perimeter: 16–24 inches long)
- Seaming tape and hot-melt adhesive (for joining pieces)
- Staples for a power stapler (if securing padding)
- Threshold trim (for transitions to other flooring)
Buying carpet yourself requires planning. Measure twice, order once. Most suppliers charge for delivery and haul-away of old material: factor that in when comparing DIY vs. professional pricing.
Preparing Your Subfloor for Success
This step separates rushed projects from quality installations. A smooth, clean, dry subfloor is non-negotiable.
First, remove the old carpet and padding completely. Use a utility knife to cut the carpet into manageable strips, roll them, and haul them out. Disconnect the tack strips if they’re still in place (pry them up with a flatbar). Vacuum the bare subfloor thoroughly, then inspect it for damage, nail pops, or uneven spots.
Wood subfloors must be solid and level. Squeaky joists can cause the carpet to buckle over time. If you hear creaking, drive additional fasteners (ring-shank nails or screws) through the subfloor into the joists below. Fill any gouges or divots with a lightweight patching compound. Concrete subfloors need to be tested for moisture before installation: excess moisture (more than 5-10 lbs. per 1,000 sq. ft. per 24 hours, per ASTM F1869 standards) will cause mold and glue failure. Rent a moisture meter if you’re unsure.
Allow new concrete to cure for at least 28 days. If moisture issues exist, install a vapor barrier or moisture-control primer. Missing this step is a common reason DIY installations fail prematurely.
Once the subfloor is clean and stable, you’re ready to install tack strips around the perimeter of the room. These thin strips have small nails angled toward the walls: the carpet will grip them to stay in place.
Measuring and Cutting Your Carpet Accurately
Accurate measurement saves money and reduces mistakes. Room dimensions aren’t always square or level, walls bow, and corners aren’t always 90 degrees.
Measure the room in multiple places: at the top, middle, and bottom of each wall. Add 6 inches to both the length and width for trimming and seaming allowance. If you’re seaming two pieces, plan the seam location so it runs perpendicular to the main light source (windows): this hides the seam visually. Mark the seam line on the back of the carpet with chalk or a marker.
Before cutting, lay the carpet out in a large, clean space (a garage or basement). Unroll it and let it acclimate for 24 hours in the room where it’ll be installed. Carpet is resilient and stretches: this acclimation step prevents wrinkles and buckling later.
When you’re ready to cut, use a sharp utility knife and a straightedge. Make one clean pass rather than sawing back and forth: multiple passes create ragged edges that fray and don’t seam well. If you’re making a seam, both edges must be perfectly straight and even. Step-by-step DIY project tutorials provide detailed guidance on cutting techniques.
For doorways and closets, trace the outline onto the carpet’s back, then cut carefully. Sharp scissors or a carpet trimmer work better than a knife for curved cuts.
Installing Tack Strips and Padding
Tack strips anchor the carpet to the floor. They’re thin strips of plywood with angled nails, and they must be positioned 1/2 inch away from the wall (not touching it, the carpet needs that tiny gap to grip the nails without bunching).
If old tack strips are still in place and undamaged, you can reuse them after scraping off old adhesive residue. Otherwise, install new ones using nails or construction adhesive. Space them 16–24 inches apart along the wall. At doorways, cut the strip to fit on each side of the transition without overlapping.
Once tack strips are secure, roll out the carpet padding (also called underlayment or cushion). Padding typically comes in 12-foot rolls: unroll it to cover the entire floor, leaving a small overlap at the walls. Seam the padding edges together using padding tape and a seaming iron, or overlap them slightly (4–6 inches) and glue them. Trim excess padding at the tack strip edge with a utility knife.
Secure the padding to the subfloor with staples (every 4–6 inches) or contact cement. This prevents it from shifting during carpet stretching. Wrinkled or loose padding will telegraph through the carpet, creating permanent bumps and dimples. Take time here, it’s tedious but essential.
Stretching, Seaming, and Final Installation Steps
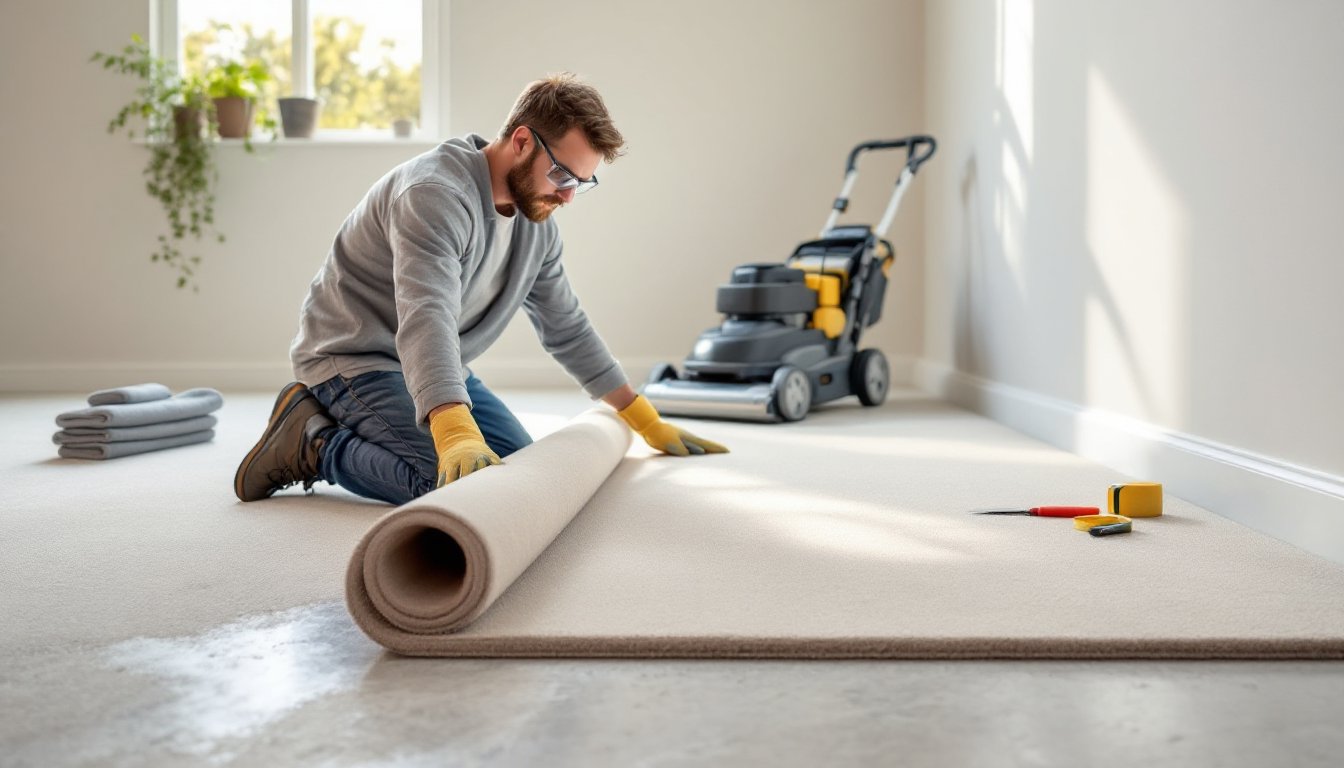
This is where DIY installations require skill and the right equipment. A power carpet stretcher applies 600–800 pounds of tension to pull the carpet tight and secure it to the tack strips. Without this, the carpet will wrinkle, bunch, and shift underfoot within months.
Rent a power stretcher and have someone help you (this isn’t a one-person job). Position the stretcher at one end of the room, attach its head to the carpet, and activate the hydraulic lever. Pull the carpet taut and kick it down onto the tack strip using a knee kicker. Work your way across the room in 12–18 inch sections, then repeat from perpendicular angles. The carpet should be tight enough that you can barely pinch it, any give means it needs more tension.
If your room is large and requires two pieces of carpet, you’ll need to seam them. This involves a detailed guide walking through the complete process. The seam must be perfectly straight, glued with hot-melt seaming adhesive, and pressed with a seaming iron (usually 300°F). Let the glue cure for 24 hours before traffic.
Trim excess carpet at the wall with a carpet trimmer or sharp knife. Fold the trimmed edge into the tack strip: use a stair tool or knee kicker to push it down into the nails. At doorways, install a metal threshold trim to protect the edge and provide a finished transition.
Final step: vacuum the entire floor thoroughly to remove debris, blend the pile, and reveal the finished texture.
Conclusion
DIY carpet installation is achievable for motivated homeowners willing to invest time, rent proper equipment, and focus on preparation and stretching. The cost savings are real, 50% off professional labor, but only if you do it right. Rush the subfloor prep or skip the power stretcher, and you’ll end up with a wrinkled, bunched carpet that fails prematurely. If you’re unsure about stretching or seaming, hire a professional for those steps and do the tearout and prep yourself: that’s a good middle-ground approach. Either way, carpet that’s properly installed, whether by you or a pro, will serve your home well for 10+ years.